Sketching on a blank canvas is the gateway to transforming a surface into a breathtaking work of art. Sketching is the vital ingredient that brings your acrylic paintings to life.�?
It allows you to experiment, refine compositions, and infuse your artwork with depth and personality. In this blog post, I’ll unveil the secrets of effective canvas sketching.�?
I’ll also guide you through the process, step by step, to help you capture your vision. As a paint enthusiast, these techniques will enhance your approach to acrylic painting.�?
So get ready to ignite your imagination and embark on an artistic adventure. Let’s dive into the world of canvas sketching together.
How to Sketch on Canvas Before Acrylic Painting in 14 Methods
You can draw on canvas using either of the following methods:
- Using a graphite pencil
- Using a transfer paper
- Using water-soluble graphite
- Using black charcoal
- Using white charcoal
- Using a projector
- Using acrylic markers
- Pastels
- Ink pens
- Colored pencils
- Using acrylic paint
- Using chalk plus fixative spray
- Drawing software and printing
- Grid method
Can You Sketch on Canvas?
Yes, you can sketch on Canvas. Sketching on canvas is a common practice and a great way to plan and prepare for your acrylic painting.�?
Drawing on the canvas is a versatile approach to your creative process.�?
Some artists prefer to forgo sketching and rely on a few guiding lines to commence their work. Other artists also find solace in planning their compositions in advance and investing time in preliminary sketches.
A classic method involves sketching a series of thumbnails to swiftly capture ideas. Once a promising concept emerges, you can proceed to develop a more detailed drawing, which you can transfer onto the canvas.
Why Should You Sketch on a Canvas Before Painting?
Sketching on a canvas before painting serves several purposes and offers several benefits. Here are a few reasons why I recommend sketching before starting a painting:
Composition and planning. Sketching allows you to plan and experiment with different compositions. It helps you decide on the placement of objects, the balance, and the proportions of the elements. By sketching, you can make adjustments and refine your ideas before painting.
Proportions and scale. Sketching helps you establish the correct proportions and scale of objects in your painting.
It allows you to measure and compare different elements, ensuring accuracy and realism. Sketching helps you identify any errors or inconsistencies in the initial stages.�?
Value and shading. With sketching, you can explore and establish the values of your composition. It helps you understand the play of light and shadow and how it affects the visual impact of your artwork.�?
Detailing and refinement. Sketching provides an opportunity to work out the details of your composition.
It allows you to focus on the intricate elements, textures, and patterns before moving on to the painting stage. By sketching, you can refine and clarify the details.
Mistake correction. Sketching is a preliminary stage where you can freely make mistakes and experiment without the fear of ruining your canvas.
By addressing these issues in the sketching phase, you avoid potential problems later in the painting process.
How to Prime a Canvas for Sketching
To prime a canvas for sketching, follow these steps:
Step 1: Gather your materials.�?
You will need:�?
- A stretched canvas
- Gesso or acrylic primer
- A wide brush or roller
- Water
- A palette or disposable plate
- A cloth or paper towel for cleanup
Step 2: Prepare your workspace. Lay down a protective covering on your work surface to prevent any spills or drips from damaging it.
Step 3: Clean the canvas. Use a clean cloth or brush to remove any dust or debris from the canvas surface. This ensures that the primer adheres well.
Step 4: Dilute the primer (optional). If the gesso or primer is too thick, you can dilute it with a small amount of water. This will make it easier to apply and create a smoother surface. Follow the manufacturer’s instructions for the appropriate ratio of water to primer.
Step 5: Mix the primer. Open the container of gesso or acrylic primer and stir it well with a palette knife or a clean stir stick. This helps to ensure an even consistency and distribution of any pigments.
Step 6: Apply the primer. Pour a small amount of the primer onto your palette or disposable plate. Dip your brush or roller into the primer, ensuring that it is evenly coated.�?
Start applying the primer to the canvas in even strokes, working from one edge to the other. Apply a thin, even layer, covering the entire canvas surface. If necessary, apply a second coat once the first coat has dried.
Step 7: Allow drying time. Follow the manufacturer’s instructions for the drying time of the primer. It may take a few hours to dry, but it’s best to leave it overnight to ensure it is completely dry.�?
Step 8: Check the surface. Once the primer has dried, inspect the canvas for any imperfections or rough areas. You can also sand the surface with fine-grit sandpaper to create a smoother surface for sketching.
Step 9: Clean up. Clean your brushes or roller immediately after use by rinsing them with water. Wipe off any excess primer from the palette or disposable plate. Clean your workspace and dispose of any protective coverings used.
Step 10. Begin sketching. Once the primed canvas is dry and any imperfections addressed, you can go ahead and sketch. Use your preferred drawing materials such as pencils, charcoal, or acrylic markers to start your sketching.�?
14 Methods on How to Draw on Canvas Before Painting it With Acrylic Paint
There are several methods you can use to sketch on a canvas before starting an acrylic painting. Here are a few common techniques:
1. Using a Graphite Pencil
Using a graphite pencil to sketch on canvas before acrylic painting gives you a versatile and convenient way to plan your compositions.�?
When choosing a pencil for canvas sketching, go for a soft graphite pencil, such as a 2B, 4B or H grade pencil. These pencils provide a good balance between creating visible lines and being easily erasable.
Cons of using pencil lines
While sketching on canvas with a pencil has its benefits, there are some potential drawbacks to consider. Here are a few cons of using pencil lines:
- Visibility. Pencil lines may not be as visible on certain canvas textures or darker surfaces.�?
- Smudging. Graphite pencil lines have the tendency to smudge, which can muddy the colors and affect the overall clarity of your painting.�?
How to draw the canvas using graphite pencil
To draw on canvas using a graphite pencil, start by preparing your canvas. Ensure it’s clean and primed for sketching.�?
Select a soft graphite pencil, like a 2B or 4B, which provides good visibility and ease of erasing. Begin with light lines, using gentle strokes to sketch your composition.�?
Focus on capturing the basic shapes and proportions of your subject. Keep the lines loose and avoid excessive detail at this stage.�?
Gradually build up more details as you refine your sketch, being mindful of creating clear and accurate outlines.�?
Use a soft eraser to make corrections or remove unwanted pencil lines, taking care not to damage the canvas surface.�?
2. Using a Transfer Paper�?
Best transfer paper for sketching
There are several transfer papers available on the market. The best one for sketching will depend on your specific preferences and requirements.�?
Here are a few popular options that I recommend:�?
- Saral transfer paper
- Strathmore 300 series tracing paper
- Canson Foundation tracing paper
- Royal Langnickel graphite transfer paper
- Wax-free transfer paper
How to sketch on canvas before acrylic painting with transfer paper
Prepare your canvas by ensuring it is clean and primed. Next, choose a reference image or create a rough sketch on a separate piece of paper.�?
Place the transfer paper on the canvas with the graphite side facing down and secure it in place. Position your reference image or sketch on top of the transfer paper.�?
Using a pencil or ballpoint pen, trace over the lines of the reference or sketch. This will transfer the graphite onto the canvas, creating a light outline of your image.�?
Once the transfer is complete, remove the transfer paper and review the sketch lines on the canvas. You can then proceed to paint over the transferred lines with acrylic paint.
3. Using Water-soluble Graphite Pencil
Water-soluble graphite pencils offer additional versatility and creative possibilities. These pencils can be easily blended and manipulated with water.
They allow you to achieve various tonal values and texture effects in your sketches.
One of the best water-soluble graphite pencils available is the Derwent Graphitint Pencil. It combines the qualities of graphite with subtle, earthy colors.
This pencil is water-soluble, allowing you to create beautiful washes and blend the graphite with water to achieve different effects.�?
I highly recommend the Derwent Graphitint Pencil if you’re looking to add a hint of color and texture to your sketches before acrylic painting.
Remember to always experiment with different pencils and brands to find the one that suits your preferences and artistic style the best.�?
4. Using Black Charcoal�?
Black charcoal is a popular choice for sketching on canvas. It offers rich, dark lines and a smudge texture that can add depth and drama to your sketches.
One of the best charcoal options for sketching is the General’s Compressed Charcoal Pencil. This pencil combines the convenience of a pencil with the versatility of charcoal.�?
It provides a smooth, consistent line and is available in different degrees of hardness. The General’s Charcoal Pencil is known for its quality and reliability, making it a favorite among artists for sketching purposes.
Remember, charcoal can be messy and smudge easily. So use a fixative spray or work with caution to prevent unintended smearing.�?
5. Using White Charcoal
You can also use white charcoal for sketching on toned canvas before acrylic painting It provides a contrasting and visible sketching medium.
Some popular brands include:
- General’s White Charcoal Pencil
- Faber-Castell White Charcoal Pencil
- Conte White Charcoal Pencil
These brands offer high-quality white charcoal pencils that are suitable for sketching on canvas before acrylic painting.�?
Experiment with different brands to help you find the one that suits your preferences.
How to sketch on canvas before acrylic paint with charcoal
To sketch on canvas using white charcoal, gather your materials and prepare the canvas by ensuring it is clean and smooth.�?
Plan your composition by deciding on the arrangement of elements and making rough sketches on separate paper. Sketch the basic shapes and outlines on the canvas using white charcoal.�?
Add value and shading to create depth, and blend and smudge the lines with a cloth or paper towel for smoother transitions.�?
Step back periodically to assess and make adjustments as needed. Once satisfied, let the sketch dry before proceeding with acrylic painting.�?
6. Projector
A projector is a helpful tool for drawing sketches on canvas before acrylic painting. They are especially helpful when you want to accurately transfer images or reference photos.�?
When it comes to the best art projectors for tracing, several options are available to consider. Some popular choices include the Artograph Tracer Projector, the Epson VS250, and the BenQ MW632ST.�?
These projectors offer good image quality, adjustability, and ease of use for tracing purposes.
How to use a projector
Start by setting up the projector on a stable surface and connecting it to a power source. Prepare your image by transferring it to a USB drive, connecting your computer, or printing it onto a transparency sheet.�?
Position your acrylic primed canvas on an easel or flat surface and adjust the projection to achieve the desired size and clarity.
With the projected image on your canvas, use a pencil or tracing tool to trace the outlines and important details. Take your time to ensure accuracy.
Once you have traced the sketch, turn off or remove the projector. You will be left with a clear, traced image ready for acrylic painting.�?
Using a projector can save time and help you achieve precise proportions and details in your sketches.�?
7. Using Markers
Using markers for sketching before acrylic painting provides a convenient and versatile approach. Markers offer precision, vibrant colors, and quick-drying properties.
This makes them a valuable tool for creating expressive and dynamic sketches on canvas.�?
Select markers that are compatible with your canvas, such as alcohol-based or water-based markers. Prepare your canvas by cleaning it and priming it.�?
Plan your composition and layout, using light pencil guidelines if needed.�?
With bold and confident strokes, sketch the shapes and forms of your subject. Incorporating different marker colors for depth and dimension.�?
Refine your sketch by adding details, textures, and shading, experimenting with layering or blending techniques.
Allow the marker sketch to dry completely before starting your acrylic painting.�?
The best markers to use:
- Copic Markers
- Prismacolor Premier Markers
- Winsor & Newton ProMarkers
- Tombow Dual Brush Pens
- Sharpie Markers
8. Using Pastels
To sketch on canvas before acrylic painting with pastels, begin by gathering your materials.�?
Prepare the canvas by ensuring it is clean and smooth. Plan your composition and lightly sketch the basic shapes and outlines using pastels.�?
Add color and texture to your sketch using pastel sticks, experimenting with blending and layering.�?
Use pastel pencils for finer details. Refine the sketch by adding more defined lines and shapes, and use the eraser for corrections.�?
If desired, apply a fixative spray to protect the sketch. Pastels offer vibrant colors and unique textures, allowing for expressive sketching.�?
9. Ink Pens
Sketching with ink pens before acrylic painting offers a distinct and precise approach to your artistic process. To begin, select the appropriate ink pens that align with your desired line thickness.
Fine-tipped pens are ideal for intricate details, while thicker pens create bolder lines and provide a sense of depth. Consider using archival ink pens to ensure the longevity of your artwork.
Take a moment to plan your composition and layout, envisioning the placement of your subject or objects on the canvas.
With the ink pen in hand, embark on your sketch, employing confident and deliberate strokes. Focus on capturing the main shapes, forms, and details of your subject.�?
Ink pens offer the advantage of producing consistent and clean lines, adding a distinctive quality to your sketch.
As you progress, feel free to explore various line weights and styles to add depth and dimension to your sketch. Experiment with cross-hatching, stippling, or shading techniques to create texture and shadows.
Once your ink sketch is complete, allow it to dry fully before proceeding with acrylic painting. This will prevent smudging or unwanted bleeding of the ink when you apply paint to the canvas.
Here are a few choices to consider for ink pens:
- Sakura Pigma Micron�?
- Faber-Castell Pitt Artist Pens
- Copic Multiliner
- Uni Pin Fineliner
- Pentel Pocket Brush Pen
10. Colored pencils
To begin, select a set of watercolor pencils that offers a wide range of colors and suits your desired effects. Clean and prime your surface to provide a smooth surface for your sketch.�?
Take a moment to plan your composition and layout. Consider the placement of your subjects and objects.�?
With the colored pencils in hand, start sketching with light, delicate strokes. Build up layers of colors and add depth to your sketch.�?
Pay attention to shading, highlights, and textures to capture the desired realism or expression. Use different pencil pressures and blending techniques to create smooth transitions and vibrant effects.�?
Take your time and work in layers, refining the details as you progress. Once your colored pencil sketch is complete, allow it to dry before proceeding with acrylic painting.�?
Here are a few popular brands that artists often turn to for their sketching needs:
- Prismacolor Premier
- Faber-Castell Polychromos
- Derwent Coloursoft
- Caran d’Ache Luminance
- Staedtler Ergosoft
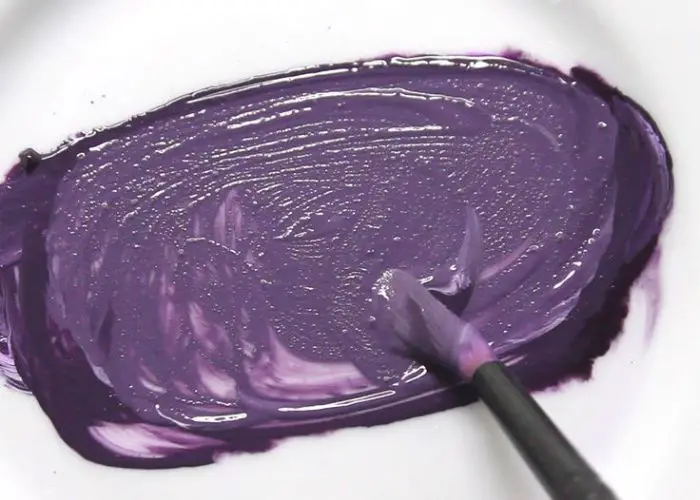
11. Using Acrylic Paint
Using acrylic paint to sketch on canvas before starting an acrylic painting can be a helpful technique to establish the composition and basic elements of your artwork.�?
Start by selecting acrylic paint colors that provide good visibility on the canvas. Prime it properly for a smooth surface.�?
With a small soft brush and a fluid consistency of acrylic paint achieved by adding some water, start sketching.
Keep the brushstrokes light and loose, as this is just an initial sketch. You can correct or refine the sketch by painting over areas with additional layers of acrylic paint.�?
Allow the paint to dry completely before proceeding with your acrylic painting. Ensure that subsequent layers don’t interfere with the sketch.�?
The “best” acrylic paint for you will depend on your specific needs, preferences, and budget. Here are a few acrylic paints that I highly regard:�?
- Golden Artist Colors
- Liquitex
- Winsor & Newton Professional Acrylics
- M. Graham & Co.
- Sennelier Abstract Acrylics
12. Using Chalk Plus Fixative Spray
Using chalk and a fixative spray to sketch on canvas before starting an acrylic painting is an effective technique to establish the composition and guide your painting process.�?
Here’s a step-by-step guide on how to use chalk and fixative spray for sketching:
First, ensure your canvas is clean and well primed. Then select a soft chalk pastel in a color that contrasts with your canvas.�?
Lightly sketch the main shapes and outlines of your subject on the canvas using the chalk. Keep your lines loose and fluid, focusing on capturing the proportions and composition.
If you make any mistakes or need to make adjustments, you can erase or smudge the chalk with a soft cloth or your fingertips. This allows for flexibility and corrections in your sketching process.
Once you’re satisfied with your chalk sketch, set it in place to prevent smudging. Apply a fixative spray designed for chalk or charcoal drawings according to the product instructions.�?
Hold the can a few inches away from the canvas and apply a thin, even layer of the fixative spray over your chalk sketch. Allow the fixative to dry completely before proceeding.
The fixative spray creates a protective layer over the chalk sketch, making it more resistant to smudging and providing a stable foundation for your acrylic painting.�?
It also allows you to paint over the sketch without the chalk interfering with the acrylic paint.
Now, you can begin your acrylic painting process, using the chalk sketch as a guide. The chalk lines will blend and integrate with the acrylic paint, enhancing the texture and depth of your artwork.
13. Drawing software and printing
First, choose a drawing software that suits your needs and proficiency level. There are various options available, such as Adobe Photoshop, Corel Painter, or even free programs like GIMP or Krita.�?
Familiarize yourself with the software’s tools and features to create your desired sketch.
Using a digital tablet or a drawing pen, sketch your composition on the digital canvas within the drawing software. Take advantage of the software’s layering capabilities to separate different elements.
Once your digital sketch is complete, ensure it’s set to the appropriate size and resolution for printing. Consider the dimensions of your canvas and adjust the sketch to fit.
Transfer your digital sketch to a computer-connected printer and print it out on high-quality paper. Make sure to select the appropriate settings to achieve accurate colors and clarity.
With the printed sketch in hand, prepare your canvas by ensuring it’s clean and primed. Place the printed sketch on the canvas, aligning it with your desired position and securing it with tape.
Using a pencil or a ballpoint pen with moderate pressure, trace over the lines of your printed sketch. The pressure applied will transfer the graphite or ink from the printed sketch onto the canvas, leaving a visible outline.
Once the tracing is complete, remove the printed sketch from the canvas. You will be left with a faint but visible guide that can be used as a reference for your acrylic painting.
Proceed with your acrylic painting, using the transferred sketch as a foundation. Build upon the outlines and fill in the details with your chosen acrylic colors, creating depth and texture on the canvas.
14. Grid method
The grid method is a popular and effective technique for sketching on canvas before starting an acrylic painting. It involves dividing both your reference image and canvas into a grid of equal squares.
It enables a systematic and accurate transfer of the image.�?
First, select a reference image and draw a grid of squares over it. Then, replicate the same grid pattern onto your canvas using a pencil and ruler.�?
Working on one square at a time, sketch the contents of each square from the reference image onto the corresponding square on the canvas.�?
This method ensures that the proportions and details are well transferred. It also provides a reliable foundation for your acrylic painting.�?
Once the grid sketch is complete, you can proceed with your acrylic painting.�?
How to Tone Canvas for Oil and Acrylic Painting
Toning the canvas is an important step in preparing it for both oil and acrylic painting. It involves applying a colored ground or wash to the canvas before starting your artwork.�?
Toning the canvas provides several benefits. These include establishing a harmonious color base, enhancing the mood, and reducing the starkness of plain white canvas.�?
To tone the canvas, choose a color that complements your intended painting. Popular choices include neutral tones like gray, beige, or warm earthy colors.�?
Dilute your chosen paint with an appropriate solvent or medium to create a wash consistency. Apply the wash evenly across the entire canvas using a large brush, working from top to bottom and side to side.�?
Allow the wash to dry completely before proceeding with your painting.�?
Read also: How to protect acrylic painting on canvas.
Pro Tips When Sketching on Canvas
Here are a few tips that can help improve your sketching process and achieve better results:
Start with light, loose lines. Begin your simple sketch with light and loose lines. This allows for easy adjustments and corrections as you refine your drawing.
Use a variety of pencil grades. Experiment with different pencil grades to create variations in line weight and texture.�?
Plan your composition. Before diving into the details, take the time to plan your composition. Consider the placement of objects, the balance of elements, and the overall flow of the artwork.�?
Pay attention to proportions. Keep a keen eye on proportions, especially when depicting human figures or objects with complex shapes. Regularly step back from your canvas to get a fresh perspective and check if the proportions look accurate.
Focus on basic shapes and structures. Instead of diving into intricate details, focus on establishing the basic shapes and structures in your sketch. This helps create a solid foundation and ensures that your drawing accurately represents the subject.
Use reference materials. Reference materials, such as photographs or real-life objects, can be valuable tools when sketching on canvas. They provide visual guidance, help with accuracy, and can inspire your creativity.
Experiment with different sketching techniques. Explore various sketching techniques to add depth and dimension to your artwork.�?
Don’t be afraid to make mistakes. Sketching is a process of exploration and learning. Embrace mistakes as opportunities for growth and improvement. If you make an error, don’t be afraid to erase or adjust your lines until you achieve the desired result.
Take breaks and evaluate. It’s important to take breaks during your sketching process. Stepping away from your canvas allows you to refresh your eyes and gain a new perspective. Use this time to assess your work and make any necessary adjustments or refinements.
Practice regularly. Sketching on canvas, like any other skill, improves with practice. Dedicate time to regular sketching sessions to hone your skills, develop your style, and gain confidence in your abilities.
Sketching on Canvas Before Oil Painting
Sketching on canvas before oil painting is an essential step to establish the composition and plan your artwork. Begin by cleaning the clean canvas.�?
With a clear vision in mind, sketch the basic shapes and outlines of your composition using a pencil or thin brush.�?
Add values and refine the details. Pay attention to proportions and capturing important elements.�?
Step back to evaluate your sketch and make any necessary adjustments. Allow the sketch to dry completely before proceeding with the oil paintings.
The sketch serves as a guide, helping with color choices, values, and composition for your oil paint. Enjoy the creative process and embrace any changes that arise along the way.
The Science Behind Gesso Drying on Canvas
The drying process of gesso on canvas involves both chemical and physical changes. These changes contribute to its solidification and preparation as a suitable painting surface.�?
Gesso is a mixture of acrylic polymer, and a filler such as calcium carbonate or gypsum. Here’s a breakdown of the science behind gesso drying on canvas:
Evaporation
When gesso is applied to a canvas, the first step in the drying process is the evaporation of water or solvent present in the mixture.�?
This evaporation occurs as the liquid component of the gesso reacts with the surrounding air. This initial drying stage leads to the formation of a solid film on the canvas.
Polymerization
The binder in the gesso, which is usually an acrylic polymer, undergoes a chemical process known as polymerization. During polymerization, the binder molecules link together and form larger chains.�?
This process is catalyzed by exposure to air and initiators present in the binder. Polymerization contributes to the formation of a strong and durable film on the canvas.
Curing
Once the gesso film has dried and the polymerization process is complete, the gesso goes through a curing phase. Curing refers to the time it takes for the gesso film to reach its maximum hardness and stability.�?
This process can vary depending on factors such as temperature, humidity, and the specific composition of the gesso. Curing ensures that the gesso is fully set and ready to accept the paint acrylics.�?
FAQs
Can you draw on canvas before oil painting?
Yes, you can draw on canvas before oil painting. First, make a preliminary drawing to plan their composition. Then establish proportions, and work out the details before applying oil paint.�? You can do this using various tools such as pencils, charcoal, or even thinned-down oil paints.�?
Do painters draw before painting?
Yes, many painters choose to draw before painting. Sketching allows artists to explore ideas, plan compositions, and work out the details before applying paint to the canvas. Drawing also helps establish the foundation and framework for the painting.
What to do before painting on a canvas?
Before painting on a canvas, there are a few preparatory steps you can take. Firstly, ensure your canvas is clean and free from dust or debris. If you are using unprimed canvas, apply an acrylic gesso to create a suitable surface for paint adhesion.�?
Should I sketch before or after gesso?
You should sketch before applying gesso to the canvas. Gesso is used to prime the canvas, creating a smoother and more receptive surface for paint. By sketching before applying gesso, you have a clean canvas to work on and can easily adjust or erase your sketch as needed.�?
Will pencil lines show through paint?
Pencil lines will only show if they are applied heavily or if you use thin paint. To minimize the visibility of pencil marks, keep your sketch lines light and use a light hand when drawing. Additionally, you can consider using a kneaded eraser to lighten or remove the pencil lines before applying paint.�?
Can you use hairspray to seal pencil drawings?
Yes, you can use hairspray to seal pencil drawings on paper. However, hairspray is not designed for this purpose and may not provide the same level of protection and longevity as professional art fixatives.�?
Conclusion
Whether you opt for traditional tools like pencils, charcoal, or ink pens, or digital methods such as drawing software or projectors, sketching provides a solid foundation for your acrylic artwork.�?
It enables you to plan compositions, establish proportions, and work out intricate details before applying paint to the canvas.�?
Furthermore, sketching instills confidence in your artistic vision. It’s also a guiding force throughout the painting process.�?
So by integrating sketching into your acrylic painting practice, you achieve greater precision. You also refine your ideas, and bring your creative vision to life with assurance.�?


Leave a Reply