Are you looking to add a bit of glamour and pizzazz to your look? Then why not try applying acrylic nails?
Acrylic nails are an easy way to instantly transform your hands, adding length, shape, and color.
Whether you’re looking for something subtle or something bold, acrylic nails can give you the perfect finishing touch.
Here’s a step-by-step guide on how to apply acrylic nails. So get ready to give yourself a professional-looking manicure.
What You Need to Put Acrylic Nails on
If you are interested in learning how to put on acrylic nails, the first step is to gather the proper materials for the job. This includes:
- Nail polish remover and cotton balls to remove any old nail polish
- A nail file and buffer to prep the nails for the acrylics
- A cuticle pusher to push back the cuticles
- Acrylic powder and liquid in colors of your choice
- An acrylic brush for applying the mixture on your nails
- Cuticle oil to moisturize and keep your cuticles healthy
- Top coat of nail polish for protection
- Some form of adhesive to attach the acrylic nails
- Nail clippers and nail scissors to trim the nails
- A soft towel to help apply pressure on
- An acrylic brush cleaner/disinfectant to clean the brush after use. Here’s a guide on how to clean dried acrylic paint brushes to follow.
Additionally, many people find it helpful to use nail tips or wraps for added durability and to create an even surface for filing.
Finally, you should have a lamp with LED or UV light available if you are using any type of gel to seal your acrylics.
Once you have all of these items in place, you can begin creating beautiful acrylic nails.
Read also: Can you paint over fake nails?
Buying Acrylic Nail Supplies
Consider an acrylic nail kit
If this is your first time attempting to do acrylic nails, I suggest you start with a kit.
Not only will these kits provide all the necessary components for the job, but they also come with comprehensive instructions that guarantee you achieve the look of your dreams.
Be sure to check what type of monomer it contains; avoid any product that has MMA (Methyl methacrylate) as it’s too hard for natural nails. Instead, opt for EMA – Ethyl Methacrylate.
To ensure quality results and eliminate guesswork from shopping around, choose a brand used by professional nail technicians or search online reviews and see which products have been recommended most frequently by other users.
Decide to buy the supplies separately
If you prefer, you can also buy all the supplies needed separately. This may cost more than buying a kit, but it will give you an opportunity to choose better quality products and provide more control over the look of your nails.
Before making any purchases, double-check that the products are compatible with each other.
Some brands might require special nail glue, and other supplies specifically designed to be used with their products.
How to Prepare Your Nails for Acrylics
Before you begin, properly prep your nails for the acrylics. We have listed the steps below.
Also, find out how long it takes to do acrylic nails.
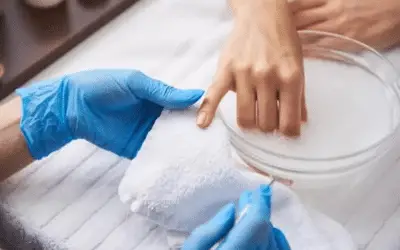
Step 1: Sanitize nails with a brush and alcohol to remove any dirt or bacteria
Keeping your nails clean and free of dirt and bacteria is very important before applying acrylics. The first step to preparing the nails is to use a brush and alcohol to sanitize them.
This will remove any dirt or bacteria that could have been left on the nail, providing a cleaner surface for the application of the acrylics.
Sanitizing also ensures that you are receiving optimal results from your manicure, as it helps prevent cracking, chipping, or abnormal color changes in the applied product.
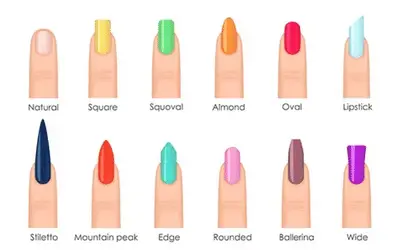
Step 2: File and shape your nails into a square, oval, or almond shape as desired
If you want to get acrylics, use a nail file to shape your nails into a square, oval, or almond shape as desired. File them in one direction rather than in multiple directions to prevent damage.
Be gentle and don’t overfile your nails – this can weaken and dry out the nails themselves.
Also make sure to keep the cuticle area clean with a cuticle pusher so that you get the best fit from the acrylics. Here are some short simple square nails that you can rock.
Step 3: Buff the surface of your nails for an even application of acrylics
Buffing is essential to help create a smooth and even surface on the nail. The buffing helps the acrylics adhere better to the nail, and it also ensures that you have an even application of the product.
Use a four-way buffer with light pressure, and make sure to not overbuff your nails as this can cause damage to them.
Step 4: Apply primer to nails (optional) if you plan on leaving the acrylics on for an extended period of time
Primer is an optional step, but if you plan to keep the acrylics on your nails for a long period of time, it’s recommended that you apply it first.
This helps create a stronger bond between the nail and the acrylic product and can help ensure that it lasts longer.
Primer also helps the acrylics adhere better and stay in place for a longer period of time, making it a great choice if you want your nails to stay looking great for longer.
Step 5: Trim cuticles and push them back from nail bed for a neat appearance
Once you’ve prepped the nails, you should trim and push back the cuticles to ensure a neat appearance.
The cuticles can easily get in the way when applying acrylics, so it’s important to make sure that they are out of the way before beginning.
Use an orange stick or a cuticle pusher to carefully push them back and then trim them if needed.
Step 6: Test fit the acrylic tips and adjust for size with clippers if needed
Before you begin the application, it’s a good idea to test fit the acrylic tips on your own nails first. This is important as it helps to ensure that they are the right size and shape for your nails.
If needed, use clippers to make any adjustments to the size of the tips. Once you are happy with the fit, you can begin the application process.
How to Apply Acrylic Nails
Now that you’ve prepped the nails and tested fit the acrylic tips, it’s time to begin applying them. Here are the step by step on how to do acrylic nails:
Step 1: Apply the tips
Applying acrylic nails can transform your hands and give you a salon-quality manicure. The first step in applying acrylic nails is to apply the tips.
Start by finding tips that suit your size and shape of finger, ensuring they are pushed back on the nail bed correctly.
Apply glue or adhesive to the underside of the nail tip, then press it onto the natural nail surface to attach, making sure no air bubbles are trapped underneath.
Hold in place for several seconds until it’s secure, before trimming and filing the tips to match your desired shape.
Step 2: Get the acrylic materials ready
Once the tips are in place, you can get everything ready for the acrylic application.
Gather all of your materials, such as an acrylic brush, acrylic powder, liquid acrylic monomer and a cuticle pusher.
Make sure the brush is clean and free of any dirt or debris that could affect the application.
Step 3: Load the acrylic brush with acrylic
Next, you’ll need to pick up a small amount of acrylic powder with the brush. Dip the brush into the acrylic powder and pick up a small amount to apply to your nails.
Make sure not to over saturate very tip of the brush with powder as this can cause it to become too thick and difficult to work with.
It might be necessary to practice this technique a few times in order to achieve the ideal ratio of liquid and powder before application.
Make sure you have paper towels nearby in case you end up brushing off too much of excess liquid product.
Step 4: Apply the acrylic mixture to your nails
Applying the acrylic mixture to your nails is a very precise process. Start by finding the smile line; this is where the nail starts to curl up from the finger bed.
Apply a small ball of acrylic to the smile line and gently brush it downwards with a flat brush, smoothing it out as you go.
Once completed, take another smaller ball of acrylic and begin to spread it in small circular movements towards your entire nail part’s cuticle area. Slightly push down at the same time, ensuring that each angle of your nail gets an even coat.
Then, use a clean brush to lightly buff the surface and apply a top coat of clear nail polish if desired.
Read also: How to use acrylic painting for nails.
Here are some tips for flawless application:
- Always use a light hand when brushing the acrylic onto your nails.
- Make sure to apply an even coat of product on each nail.
- If the product is getting too thick, use some liquid monomer to thin it out.
- Take your time when applying the acrylic and use a steady hand.
- Work in small sections and take regular breaks to help prevent mistakes.
- Always work quickly so the acrylic doesn’t start to set before you finish.
Step 5: Let the acrylic dry
Once you’ve applied the acrylic to all of your nails, it’s time to let them dry. This usually takes around 10-15 minutes, but you can use a fan or hairdryer to speed up the process if necessary.
After the acrylic has dried, use a file to shape and smooth out your nails before applying a clear top coat for shine and protection.
How to Finish the Look
After you are done with the application of your acrylic nails, it is important to finish them off correctly.
- Applying the Sealant: Apply a thin coat of acrylic sealant to each nail, making sure to cover every corner. Use clear polish for a glossy finish or use colored polish for a more unique look.
- Drying and Curing: Allow the sealant to dry for at least two hours before you can move on to the next step.
- Adding Color: Choose a color of your choice and apply one coat of nail polish over the sealant. This can be done with a paint brush or an airbrush for more precise application.
- Sealing with Top Coat: Use a top coat of your choice to add shine and protect your manicure. This can be done with a brush or an airbrush for more precise application.
- Maintaining Your Manicure: Regularly use cuticle oil and hand cream to keep your hands soft and moisturized. Apply top coat every few days to protect your manicure.
- Adding Nail Art: You can add nail art or design of your choice to complete the look. This can be done with a brush or an airbrush for more precise application.
- Final Step: Clean up any smudges or mistakes you may have made with a Q-Tip dipped in nail polish remover.
Related Read: What brush can I use for acrylic nails?
How to Remove the Acrylic Nails
Fake nail removal is a fairly simple process. It’s important to start by gathering the necessary supplies: cotton balls, nail acetone, nail clippers (or an electric file if you have one), and cuticle pusher.
But can you clip acrylic nails? Let’s find out if it’s possible and how to do it.
First, begin by clipping off your acrylic nails as close to the natural nail bed as possible.
Then, soak a few cotton balls in acetone and place them on top of each nail. Allow the acetone to sit for at least 15 minutes so that it can properly break down the acrylics.
Once your nails feel soft and rubbery, carefully remove the cotton balls and use your cuticle pushers to gently push off any remaining fragments of acrylics.
If necessary, you can also use an electric file with a medium-grit bit to buff away any leftover pieces of acrylic.
Finally, use warm water to cleanse your nails before applying a moisturizing lotion or oil to prevent dryness.
Interesting read: How old do you have to be to get fake nails?
Tips for Keeping Your Acrylic Nails Looking Good
Keeping acrylic nails looking their best requires routine maintenance. To prevent acrylic nails coming off after a week, follow the following rules:
- Trim them regularly to check the fit of the acrylics around the edge of the nail bed.
- If they’re too tight, they can cause damage to your natural nail and need to be adjusted or removed.
- File gently but often, using a high-quality file specifically made for acrylic nails; this helps to prevent splitting, peeling and cracking on the tips and sides of your nails.
- You also want to apply cuticle oil or moisturizer around the base of each nail – this will help keep the skin soft while keeping moisture in your nails.
- Finally, wear water nail tips and avoid exposure to chemicals like hand sanitizer. A nail technician can recommend products specifically designed to protect your acrylic nails and help keep them looking great.
Find out more on how to remove acrylic nails using oil and hot water.
FAQs
What do you need to do acrylic nails at home?
To do acrylic nails at home, you’ll need the following supplies: nail clippers, nail file, nail primer, acrylic powder, acrylic liquid monomer, acrylic brush, top coat, and a sealant. You may also want to have nail art supplies if you’d like to add designs.
Here’s an article on how to make acrylic liquid monomer.
How long does it take for acrylic nails to dry?
It typically takes around 10 minutes for acrylic nails to dry. However, this can also depend on the environment and how thick the acrylic nails are. In warm, dry conditions, the acrylic tip of nails may dry quicker than in cooler, humid environments.
How to do acrylic nails at home step by step?
Step 1: Prep the Nails. Begin by cleaning, trimming and filing your nails to create a smooth surface.
Step 2: Apply Primer and Acrylic. Using a brush, apply a thin layer of primer to your nails.
Step 3: File and Shape. Using a nail file, shape your nails into the desired shape.
Step 4: Apply Sealant and Top Coat. Apply a thin layer of sealant and top coat to your nails.
Step 5: Clean Up. Finally, use a Q-Tip dipped in normal nail polish remover to clean up any smudges or mistakes you may have made.
Step 6: Add Nail Art (optional). You can also add any nail art or designs of your choice.
Step 7: Finish with Cuticle Oil. To prevent dryness and keep the skin around the nails soft, finish with cuticle oil or moisturizer.
How to do acrylic nails for beginners?
To begin, you’ll need a high-quality nail file, acrylic powders and monomer liquid, top coat and sealant, primer, and a brush. Start by prepping your nails and filing them into the desired shape. Then, brush flat them, use a brush to apply a thin layer of primer. After that, mix the acrylic powder and monomer liquid to create a paste, then use the brush to apply it onto your nails. You can also add any nail art or design of your choice. Finally, apply a thin layer of sealant and top coat.
Can you put acrylic over a green nail?
Yes, you can put acrylic over a green nail but I do not recommend it. A green nail could be an indication of an underlying infection, such as Pseudomonas aeruginosa. First, address the underlying cause before covering the nail with acrylic.
Who made acrylic nails?
Acrylic nails were made by Dr. Frederick Slack Jr. and Dr. Thomas Slack, who created a process using dental acrylics to repair and replace patients’ fingernails.
How long do acrylic nails stay on?
Acrylic nails stay on for about 4 to 6 weeks before requiring maintenance or a fill-in appointment. However, the exact duration can vary depending on factors such as the individual’s nail growth rate, the quality of the application, and how well you care for them.
Conclusion
Acrylic nails can give your hands a beautiful and sophisticated look, but they require regular maintenance to keep them looking their best.
With the right supplies and a bit of practice, you can create your own acrylic nails at home.
Remember to prep the nails, apply primer and acrylic, file and shape, apply sealant and top coat, clean up any mistakes and finish with cuticle oil.
Following these steps can help keep your nails looking great. So, what are you waiting for? Get creating and show off your beautiful acrylic nails. Let us know how it went.

Leave a Reply