Hard gel and acrylic are the go-to products if you desire long nails. They provide strong, long nails that easily withstand everyday rigors.
Additionally, acrylic and hard gel nails are self-leveling and easy to shape and mold.
But which is better? Which one should you pick on your next mani-pedi? The following guide should help you make the right choice.
Hard Gel Nails vs Acrylic Nails
Hard gel nails are made of a gel-like substance cured under a UV lamp, while acrylic nails are formed using a liquid and powder mixture. Hard gel nails are more flexible and natural-looking, while acrylic nails are stronger and more durable.
What’s Hard Gel?�?
Hard gel is an innovative nail enhancement from the gel family. Also known as traditional or standard gel, it’s a chemical makeup primarily comprising monomers and oligomers (chains of monomers).
It also contains other ingredients to harden, cure, and protect the nails.
It’s often contrasted with soft gel, a softer gel manicure that’s easier to remove. Both hard and soft gels are fluid gels that harden into plastics.
However, you can soak off soft gel in acetone but cannot do the same for hard gel.
The main reason is that the molecules in a hard gel are more tightly packed. So, acetone doesn’t penetrate the substance.
Unfortunately, a few people confuse hard gels with builder gel. Though both are harder than gel polish and soft gel and great for gel extensions, they aren’t the same products.
Builder gel is a harder version of soft gel, which you can soak off in acetone.
However, you cannot soak off hard gel in acetone. Also, builder gel is softer than hard gel.
Finally, hard gels are not the same as gel extensions. Hard gel is the product that goes on the nail.
Meanwhile, extensions are long artificial nails (gel or acrylic) that extend past the natural nail.�?
How is Hard Gel Applied?
Hard gel is sold in small pots and is ready to apply out of the box, though you need a special densely-packed nail brush to apply the product.
The application process is simple but requires several tools and materials. For instance, you need a base coat to enhance adhesion.
The base coat goes on the natural nail and is the foundation for the hard gel.
Also, you need a top coat to shield your gel nails from harsh environmental conditions, especially sunlight, water, and UV light.
Applying hard gels is easy once you have all the tools and materials. The overall process is as follows;
- Prep the nails:�?Trim and shape the nails using a nail file. Then apply cuticle oil to moisturize the nail bed and the surrounding skin and buff the nails with a nail buffer. Next, wipe them with rubbing alcohol to sanitize the area and kill germs and bacteria.
- Apply the base coat:�?This step is critical. Otherwise, your gel nails won’t stick. But more importantly, ensure a thin, even base coat layer for beautiful, balanced nails. Cure the base coat with an LED lamp for 30 seconds. It feels sticky (not dry) after curing.
- Apply hard gel:�?The process is similar to applying gel polish. Apply a thin, even layer using a gel brush and cure under an LED lamp for 30 seconds or as the manufacturer recommends. The hard gel hardens to an extra-strong surface when fully cured.
- Apply the top coat:�?A top coat is optional but highly beneficial. Again, apply a thin, even layer and cure with an LED lamp for 30 seconds. Then apply cuticle oil.
Hard Gel Pros and Cons
Pros
- It’s the strongest type of gel manicure.
- It’s perfect for attaching a nail extension.
- Resists cracking and breaking
Cons
- It is expensive.
- It’s not much more durable than softer gels.
What are Acrylic Nails?�?
Acrylic nails need no introduction among artificial nail lovers. They are the most popular and safest artificial nails because they are readily available, easy to install, cost-effective, and durable.
They last a staggering 6-8 weeks, whereas competing options only last 2-3 weeks. Read our article “How long do fake nails stay on?” to understand the longevity of acrylic nails.
Another difference between acrylics and other artificial nails is that the product isn’t pre-mixed.
Instead, the nail technician mixes the acrylic powder and liquid monomer during application.
The two main acrylic liquid monomers are ethyl methacrylate (EMA) and Methyl Methacrylate (MMA). MMA nails are harder and more durable.
However, they have a grainy texture and turn yellow with time.
Meanwhile, EMA monomers are slightly softer but harder than the other artificial nails. However, they are more flexible and easier to soak off.
When were acrylic nails invented? Read on to find more.
How are Acrylic Nails Applied?
Applying acrylic nails is only slightly different than gel nails. The basic application process is as follows;
- Prepare the nails:�?Use acetone to remove old nail polish. Then trim your nails, buff the nail plate, and push back the cuticles. You also want to apply a little cuticle oil at this point to hydrate the surrounding skin.
- Apply nail primer:�?Nail primer removes moisture and oils from the nails, providing a clean and dry surface for the installation of acrylic nails. Wipe the nails with acetone-dipped cotton balls. Then apply nail primer.
- Apply the acrylic nails:�?Start with the tips if you intend to extend the nails. Then dip the brush in the acrylic liquid monomer, brush it against the side of the bowl to remove excess liquid, then dip it into the acrylic powder. Finally, apply the material to your nails. Finish one nail at a time, and let them air dry.
- Finish up:�?Shape the nails using a coarse nail file (such as 180 grit), buff them with a nail buffer, and paint them with clear (or colored) nail polish. Lastly, apply cuticle oil to hydrate the nails.
Interesting read: How to use acrylic powder without acrylic liquid.
Acrylic Nails Pros and Cons
Pros
- Extremely strong and durable
- Resistant to cracking and breaking
- Acrylics are cost-effective
Cons
- Acrylic nails are challenging to remove
- They require aggressive filing during installation
Read also: Acrylic nail removal price.
Acrylic Nail Art vs Hard Gel Nail Extensions: Head-to-Head�?
Now we know the basics of hard gel and acrylic nails. But maybe you still need help choosing one.
The following head-to-head comparison should make your work easier.
1. Application�?
The first main difference between acrylics and hard gel nails is the nail prepping and product application process.
First, both need filing to create a rough surface for adhesion. However, acrylics tend to require a rougher surface.
Next, the priming process is also slightly different. Whereas acrylic nails require MMA or EMA primers, hard gels require base coats containing resins and primers.
Finally, the application process differs too. Acrylic manicures are two-part products that arrive in two bottles.
First, dip the brush in the liquid monomer, then the acrylic powder, and apply it to the nail. Meanwhile, hard gels arrive in a single bottle for easier application.
Read also: Can you get acrylics with short nails?
2. Drying and Curing Process
Acrylics and hard gel nails cure differently. Gel nails are cured with UV or LED lamps.
They don’t air-dry naturally as the thick substance doesn’t permit the penetration of air molecules. The base product and gel top coat is also UV or LED-cured.
On the other hand, acrylic nails are air-dried. Once you finish applying the material, air dry it for several minutes.
The primer and nail polish also dry when exposed to the air.
Another difference is curing times. Gel nails dry very fast, typically in 30-60 seconds.
The same applies to the base and top coats. Meanwhile, acrylic nails dry in 15-20 minutes.
3. Ease to DIY
Going with acrylic nails is better if you plan to do it yourself. This doesn’t mean you cannot apply gel nails yourself.
However, it’s a more technical process that is best left to professional nail technicians at a nail salon.
Take the curing process, for example. You can only expose your nails to UV curing systems for 60 seconds or less. Otherwise, you may run into problems.
First, it’s bad for your health. In addition, overexposure dries the nails and surrounding skin, causing cracking and damaging the nail bed.
That said, acrylics appear better, too, when applied professionally. So, only consider DIY after exhausting other alternatives.
4. Hardness and Durability
The main advantage of acrylic nails is hardness and durability. They are the hardest nails in the industry and are more durable than other alternatives.
But are they stronger than hard gel nails? Many past users disagree. Hard gel manicures withstand greater pressure and are less likely to crack.
Indeed, they were made purposely to offer a stronger version of gel manicures. Moreover, they are more flexible than acrylics.
Nevertheless, acrylics last longer. Hard gels only last 2-3 weeks at most, whereas acrylic nails easily last 6-8 weeks.
5. Removal
This may come as a surprise, but gel nails are just as hard to remove as acrylic nails. This is the primary difference between hard gel and builder gel.
While builder gel easily soaks off with acetone, hard gel manicure doesn’t come off fully, no matter how long you dip your hands in acetone. Instead, you must manually file away the fake nail.
The same applies to acrylic nails. The removal process is tedious.
But how do salons remove acrylic nails? They use electric drills or e-files to hasten the process.
But remember that electrical equipment increases the risk of nail damage.�?
For this reason, you should consider alternative options if you desire easy-to-remove artificial nails. We recommend soft gels.
6. Damage to Natural Nails
The aggressive removal process already tells you that hard gels and acrylic nails can damage your nails.
The process makes nails thin and brittle, increasing the risk of nail cracks and breakage.
However, acrylic nails are worse. For instance, you must aggressively file away the nail plate to set acrylic nails. Otherwise, the product doesn’t adhere strongly.
Now, imagine filing down the plate during application and again during removal! It quickly takes a toll on nail health and strength.
Most importantly, all artificial nails irritate the natural nail bed. That’s why your nails itch for the first few hours or days following a mani-pedi. But, again, acrylics are worse.�?
7.�?Ease of Maintenance
There’s little difference between hard gel and acrylic nail maintenance. Both require regular touch up and periodic fill-ins to bridge the gap at the cuticle area as the natural nails grow longer.
Otherwise, the nails become dry and begin to crack.
In addition, you must keep the nails hydrated and protect them from overly dry conditions. Otherwise, they crack.
Finally, you must maintain personal hygiene to ensure healthy nails. For instance, wash the nails regularly and trim and shape them daily.
That way, your nails won’t get trapped in fabrics or invite debris.
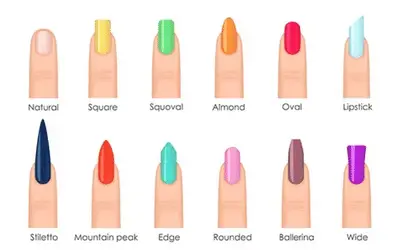
Interesting read: Different shapes of fake nails.
8.�?Cost
Upfront and maintenance costs are the last major difference between hard gel and acrylics.
Both are affordable (to most users) and relatively inexpensive to maintain. However, acrylic nails are more cost-effective.
Whereas the average acrylic nails price is $10 to $30, a set of hard gel nails costs an incredible $80 to $120.
The actual cost depends on the location and type of nail salon, the hard gel brand, and technician expertise.
Also, acrylics are easier to maintain. For instance, regular gel polish is twice as expensive as acrylic nail polish.
You can also use regular nail brushes for acrylics but require a special gel brush for gel nails.
Hard Gel Nails vs Acrylic Nails Comparison Guide Table
| Comparison Factor | Acrylic Nails | Hard Gel Nails |
| Application | Two-part product that requires liquid monomer, acrylic powder, and primer | Easier to apply with a single bottle of gel that requires base coats containing resins and primers |
| Drying and Curing Process | A hard gel manicure doesn’t come off fully, no matter how long you dip your hands in acetone. Instead, you must manually file away the fake nail. | UV or LED-cured, which requires exposure to UV curing systems for 60 seconds or less |
| Ease to DIY | Easier to apply at home | Air-dried primers and nail polish also dry when exposed to air |
| Hardness and Durability | Hardest nails in the industry and are more durable than other alternatives | Hard gel manicures withstand greater pressure and are less likely to crack |
| Removal | The removal process is tedious and requires electrical equipment | A more aggressive removal process and must file down the nail plate during application and again during removal |
| Damage to Natural Nails | Both require regular touch-ups and periodic fill-ins to bridge the gap at the cuticle area as natural nails grow longer. | The process makes nails thin and brittle, increasing the risk of nail cracks and breakage. |
| Ease of Maintenance | Both require regular touch-ups and periodic fill-ins to bridge the gap at the cuticle area as natural nails grow longer | Little difference between the two |
| Cost | Cost-effective and more affordable | More expensive and can cost up to $80-$120 |
Read: What is the difference between tips and acrylics?
Hard Gel vs. Acrylic: Which One is Better?
Hard gel is the toughest form of gel nails and is typically used with nail forms to prolong the length of the nail.
So, it’s almost similar to acrylic, except that acrylics are two-part products mixed on-site. However, they differ in a few ways.
When to Apply Acrylic Nails:�?Acrylic nails are ideal for a regular mani-pedi. They’re easier to apply, are cost-effective, and last longer. Above all, they easily withstand daily wear.
When to Apply Hard Gel Nails:�?Hard gel nails are great if you desire gel nails but want something stronger and more durable. They are also great for special events.�?


Leave a Reply