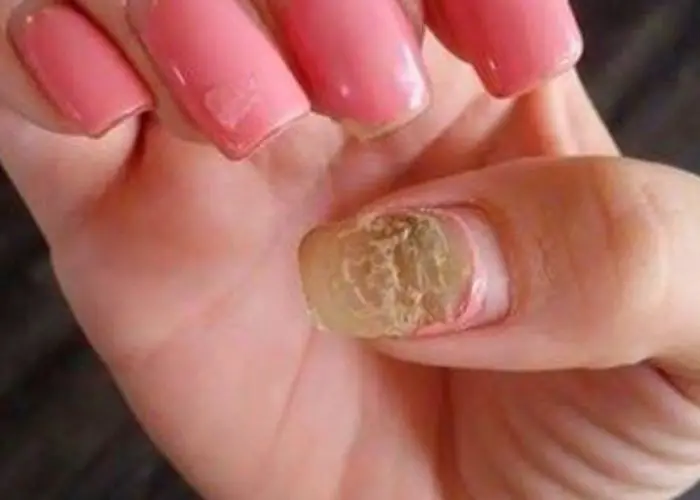
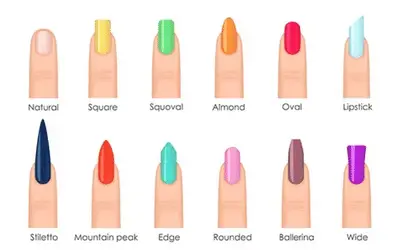
Acrylic nails are a great way to add length and strength to your natural nails, but they can be difficult to keep clean.
Dirt and oils can build up underneath the acrylics, which can lead to fungal infections or other nail problems.
This blog post will discuss how to clean under acrylic nails using five different methods.
We will also provide tips for keeping your nails healthy and looking their best between fills!
How to Clean Under Acrylic Nails
Start by washing your hands with antibacterial soap. This will help to remove any dirt and oil that may be on your skin. Next, soak a cotton ball in rubbing alcohol and use it to wipe under your nails. You can also use a nail brush or soft-bristle toothbrush to scrub under your nails. Finally, use a cuticle pusher to remove dirt and debris from your nails. Repeat this process every day to keep your nails clean and free of infection!
Dirt and Acrylics
It’s no secret that dirt and acrylics don’t mix. In fact, one of the main reasons why people get acrylic nails is to avoid having to deal with the hassle of cleaning under their real nails.
However, if you don’t clean under your acrylics regularly, you’re opening yourself up to a whole host of problems.
Not only can dirt and bacteria cause your nails to become discolored, but they can also lead to nail greenies.
Read our article on painting nails with pseudomonas to find out more about greenies.
Can Mold Grow Under Acrylic Nails?
Mold can grow under acrylic nails if the conditions are right. The warm, moist environment created by sweat and dirt is the perfect breeding ground for mold spores.
If you have a weakened immune system or suffer from diabetes, you’re at an increased risk of developing a fungal infection.
How to Clean Underneath Acrylic Nails – 7 Methods
So how do you clean under your acrylics? Here are five methods that you can use:
1. Using Antibacterial Soap
If you’re hoping to maintain a pristine manicure, it’s important to regularly clean underneath your acrylics.
The good news is that this process is easy — simply use antibacterial soap and warm water.
What you’ll need:
- Antibacterial soap
- Warm water
- A bowl or cup
- Cotton swab
How to clean underneath acrylic nails
- Wet your hands with warm water.
- Apply a small amount of antibacterial soap to your fingertips and rub them together.
- Use a cotton swab to reach under your nails and remove any dirt or debris.
- Rinse your hands with warm water and dry them with a clean towel.
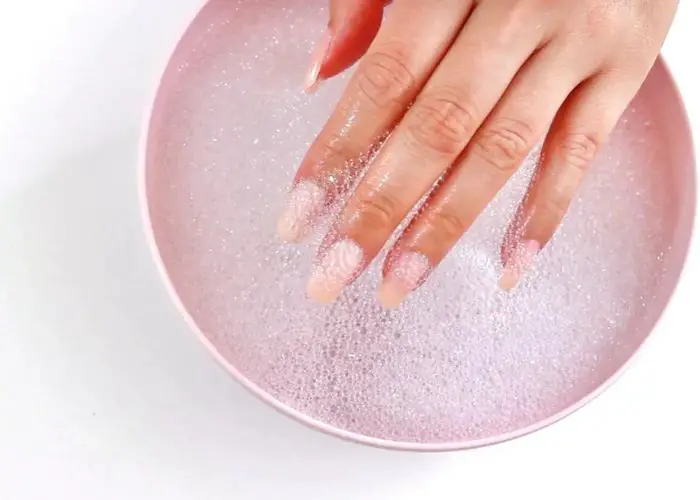
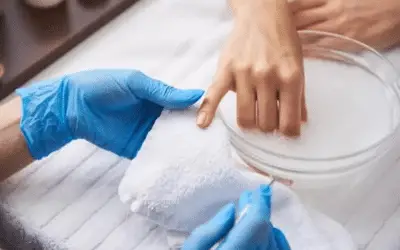
2. Nail Soak Using Rubbing Alcohol
You can use a nail soak if you’re looking for a more intensive way to clean under your acrylics. This method is especially effective at removing tough dirt and stains.
What you’ll need:
- Rubbing alcohol
- A bowl or cup
How to clean acrylic nails
- Fill the bowl or cup with rubbing alcohol.
- Soak your nails in the mixture for five to ten minutes.
- Use a cotton ball to remove any residue.
- Rinse your nails with warm water.
- Repeat this process as needed.
3. Use a Nail Brush/Soft-Bristle Toothbrush
If you don’t have a nail brush, use a soft-bristled toothbrush to clean under your acrylics.
How to clean under fake nails
- Be sure to use gentle circular motions when using a toothbrush.
- Next, use a clean toothbrush or nail brush to remove any dirt and debris accumulated under your nails.
- Rinse the brush’s bristles in between each stroke to avoid spreading bacteria.
- Repeat this process until all of the dirt and debris has been removed.
Read Also: Can you use paint brushes for nail art?
4. Using Cuticle Pusher
A cuticle pusher is a small, metal, or plastic tool with a blunt, curved end. It is used to push back the cuticles and can also help to remove dirt and grime from under the nails.
How to clean under nails with acrylics using pusher
- Soak your hands in warm water for a few minutes to soften the nails and cuticles.
- Gently push back the cuticles with the curved end of the pusher.
- Use the flat end of the pusher to scrape any dirt or grime from under the nails.
- Wash your hands with soap and water to remove any debris.
- Apply hand cream or lotion to moisturize the skin.
5. Using Denture tables
- Fill a bowl or basin with warm water and drop one or two denture-cleaning tablets into it. Ensure the tablets dissolve completely, creating a fizzy solution.
- Place your hands with the acrylic nails into the bowl, ensuring the solution covers the nails entirely. Let them soak.
- Take a soft-bristled brush or toothbrush and gently scrub the acrylic nails, focusing on the underside. Use gentle circular motions to remove any dirt, debris, or stains. Be gentle to prevent damaging the nails.
- Rinse your hands thoroughly with clean water to remove any residue from the denture cleaning solution. Ensure that all traces of the solution are washed away.
- Finally, dry your hands completely using a clean towel or paper towels.
7. Hydrogen Peroxide Solution
Hydrogen peroxide can act as a disinfectant and help to cleanse underneath your acrylic nails.
This method can not only remove dirt and debris but also ensure that any harmful bacteria are killed.
What you’ll need:
- 3% hydrogen peroxide solution
- A bowl or cup
- Cotton swab
How to clean underneath acrylic nails using hydrogen peroxide
- Pour the hydrogen peroxide solution into a bowl or cup.
- Dip a cotton swab into the solution.
- Gently swipe the cotton swab under each acrylic nail to cleanse and disinfect.
- Allow your nails to air dry.
- Wash your hands with soap and warm water.
7. Tea Tree Oil Cleanse
Tea tree oil is known for its antibacterial properties and can be effective at cleansing under acrylic nails and keeping them free from potential fungal infections.
hat you’ll need:
- Tea tree oil (pure)
- A bowl or cup of warm water
- A dropper
- Cotton swab
How to clean under acrylic nails using tea tree oil:
- Add a few drops of tea tree oil to the bowl or cup of warm water.
- Mix well until the oil is dispersed throughout the water.
- Dip a cotton swab into the solution.
- Swipe the moistened cotton swab gently under each nail to remove debris and apply the antibacterial properties of the tea tree oil.
- Allow your nails to air dry.
- Wash your hands with soap and warm water.
Visit the Nail Salon
If you’re having trouble keeping your nails clean and healthy, it may be time to visit the nail salon.
A professional can assess the condition of your nails and provide you with treatment options. They can also give you tips on how to care for your nails between visits.
Also, check out our guide on acrylic vs hard gel so you can be able to make a choice on what to wear on your nails.
How to Clean Under Gel X Nails
If you don’t clean under your gel acrylic nails regularly, they can start to look yellow and gross.
But don’t worry, I’m here to help! Here’s how you can easily clean under your gel nails:
- First, you’ll need to gather a few supplies. You’ll need a nail brush, some nail polish remover, and a cotton ball.
- Once you have everything, soak your nails in nail polish remover for a few minutes. This will help to loosen the dirt and debris accumulated under your nails.
- Next, use the nail brush to scrub away any remaining dirt.
- Finally, use the cotton ball to remove any excess nail polish remover.
How to Cut Real Nails Under Acrylics
It’s a delicate process that can be time-consuming if you don’t know how to do it properly.
Here’s a quick guide on how to cut your real nails under acrylics without damaging your manicure:
- Start by gently pushing back the acrylic nail with a cuticle pusher or orange stick. You want to create a small gap between the acrylic and your natural nail.
- Next, take a sharp nail clipper and carefully trim the excess nail. Avoid clipping too close to the edge of the acrylic, as this can cause lifting.
- Once you’ve trimmed away the excess nail, use a file to smooth out any rough edges. And that’s it! Now you know how to quickly and easily trim your real nails under acrylics.
Additional Resources
How to Remove Fake Nails with Hot Water
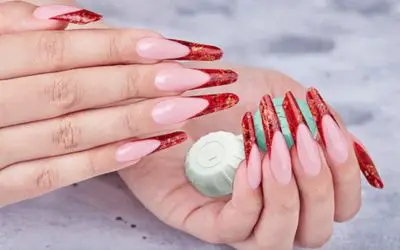
How to clean stained acrylic nails
- Gather your supplies: You will need a bowl or basin, warm water, mild soap or dish detergent, a soft-bristle brush or toothbrush, a clean towel, and a nail buffer (optional).
- Fill the bowl or basin with warm water: Make sure the water is comfortably warm, but not too hot.
- Add a small amount of mild soap or dish detergent to the water: Mix it gently until it creates a soapy solution.
- Soak your stained acrylic nails in soapy water: Submerge your nails fully in the solution and let them soak for 10-15 minutes. This will help loosen any dirt or stains on the nails.
- Gently scrub the nails using a soft-bristle brush or toothbrush: Take the brush and gently scrub your nails, paying special attention to the stained areas. Use light circular motions to remove any residue or stains.
- Rinse your nails with clean water: After scrubbing, rinse your nails thoroughly with clean water to remove any soap residue.
- Pat dry your nails with a clean towel: Gently pat your nails dry with a clean, soft towel. Avoid rubbing too vigorously, as this can damage the acrylic nails.
- Buff the nails (optional): If there are still some stains or discoloration on the nails, you can use a nail buffer to buff the surface of the acrylic nails gently. Be careful not to over-buff, as it can thin the nails.
- Apply cuticle oil or moisturizer: After cleaning, apply cuticle oil or a moisturizer to keep your nails and surrounding skin hydrated.
Recommended read: Tips vs acrylics.
How to keep acrylic nails clean
- Moisturize hands and cuticles with a hydrating lotion.
- Avoid immersing nails in hot water for prolonged periods.
- Protect nails by wearing gloves when doing chores or handling chemicals.
- Refrain from using harsh nail polish removers.
- Regularly inspect for lifting edges and address promptly at a nail salon.
- Avoid picking or biting nails to maintain integrity.
How to get rid of nail growth under acrylics
Natural nail growth under acrylic is quite fast. So here is an easy step to remove nail growth under acrylics:
- Gather the supplies you’ll need: acetone, cotton balls, aluminum foil, nail clippers, and a nail file.
- Begin by trimming your small square acrylic nails using nail clippers, but be cautious not to cut your natural nails.
- Gently file the surface of the acrylic nails to eliminate the shine, aiding the penetration of acetone.
- Soak a cotton ball in acetone and place it on each nail, ensuring it covers the entire nail.
- Wrap aluminum foil around each finger to secure the cotton ball in place, and let it sit for 15-20 minutes. This allows the acetone to loosen the acrylic.
- Remove the foil and cotton balls, and gently push off the softened acrylic from your natural nail using an orangewood stick or cuticle pusher. Be gentle to prevent any damage.
- If there is any remaining acrylic, repeat the soaking process for a few more minutes until it becomes easier to remove.
- Once all the acrylic is gone, wash your hands thoroughly with soap and water to remove any residue.
- Finally, apply a moisturizing nail oil or cuticle cream to nourish and hydrate your natural nails.
Interesting read: Can you get acrylics on short nails?
How to Take Care of Acrylic Nails Between Fills
If you want your acrylic nails to last, taking care of them between fills is important. But how long do acrylics last?
Here are a few tips on acrylic nail upkeep;
- Wash your hands with soap and water regularly. This will help to remove any dirt or bacteria that could cause your nails to become damaged.
- Be sure to moisturize your hands and nails daily. This will help to keep the skin around your nails healthy and prevent the acrylics from becoming brittle.
- Avoid using any harsh chemicals or cleaners on your nails. These can cause the acrylics to lift or crack.
- If you notice any lifting or cracks, make an appointment with your nail technician as soon as possible.
Also, find out how many times you can get your nails filled in between acrylics.
Related Post: How Long Does It Take to do Acrylic Nails
FAQs
What is the white stuff under my acrylic nails?
The white stuff under your acrylic nails is called keratin. It’s a protein that’s produced by the body, and it helps to keep the nails strong and healthy. However, when it builds up under the nails, it can cause them to become yellow and discolored.
How do I prevent the white stuff from building up under my nails?
There are a few things you can do to prevent the white stuff from building up under your nails:
Wash your hands regularly and scrub under the nails with a nail brush.
Be sure to moisturize your nails and cuticles daily.
Avoid using any harsh chemicals or cleaners on your nails.
Why is my nail black under my acrylic?
If your nail is black under your acrylic, it could be due to a reaction to the acrylic itself or an infection. If you notice your nails are black, see a doctor or nail technician as soon as possible. They will be able to assess the situation and provide you with treatment.
Why are my nails yellow under acrylics?
If you’re wondering why your nails are yellow under acrylics, it’s likely due to a dirt and oil buildup. Acrylics act like a barrier, trapping everything underneath them. While this can be beneficial in terms of protecting your natural nails, it also means that any dirt or oil that gets trapped will cause your nails to yellow over time.
Final thoughts on how to clean fake nails
Acrylic nails can be a great way to protect your natural nails and make them look their best.
However, taking care of your nails and regularly cleaning under the acrylics is important to prevent dirt and oil buildup.
If you notice any lifting or cracks, make an appointment with your nail technician as soon as possible.
And be sure to moisturize your nails and cuticles daily to keep them healthy!
Thanks for reading!


Leave a Reply